Browsing Tag

jewelry tutorial

Crafts DIY

Knot Your Own Fortune Coins Necklace

03/25/2009

Hi, my name is Amanda Yu, I am the owner and designer of ”Exotic Flavour” the colorful, playful and creative jewelry design. I am grateful that I had been invited by Miseducated to prepare this DIY story for you. I hope you will like it. I will show you how to make this Fortune Coins Pink Necklace.

fortune necklace

Instructions

1. The material is very simple, prepare a Pink cotton cord (length: 155cm and thick: 3mm) and Sex piece of the round wood ornament with a hole in the middle.
2. Put on one wood ornament and make a knot. This is a part of the clasp.
3. Coil two small circles, hold tight with your left thump.
4. Round the third circle between the first two circles, pull the cord generally.
5. Put another wood ornament and repeat (3.) and (4.) until you have five patterns.
6. In the end of the cord I made an oriental cross knot and tight it nicely.
7. If you think it is complicated, you can make any knots you like. Just make sure the little circle is not too big for the wood ornament – other part of the clasp. (1)
8. The Fortune Coins Pink Necklace is now finished.

I hope you find this is inspiring. You can combine with different materials or perhaps develop another construction from this basic oriental knot. Here are two other creation I made earlier based on the same techniques.

Crafts DIY

Cute as a Button Earrings You Can Make

01/13/2009

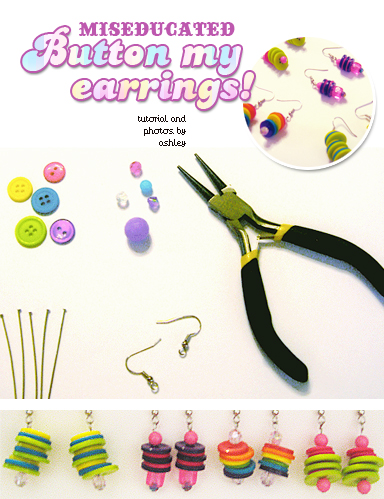
Most of us have seen button stud earrings, and maybe even the cluster button earrings. Either way, here’s a new twist on the popular trend. I call them Swivel Stacked Button Earrings. They are extremely easy to make, and can be done using all kinds of variations, colors, and different kinds of beads.

button my earrings

What you’ll need

Flat Headpins (preferably the long ones)
Buttons in assorted colors and sizes (you could also experiment with different shapes for unique looks)
Various beads (small ones are used to keep buttons on headpin, while others can be used for decorative purposes)
French Hook Earrings
Wire Trimmers
Needle Nose Pliers

Step 1

Since most buttons have too large of a whole, you’ll need to first put a small bead on the headpin to keep buttons from sliding off.

Step 2

Take your buttons and put them on in any order you want. You can vary from size or colors depending on the look you want. At this point, you can also add various beads if you choose.

Step 3

Once you’ve got your earrings looking the way you want, it’s time to attach the headpin to a French hook earring. Assuming you have quite a bit of length left on your headpin, this is where you can trim off any excess. Be sure to leave enough length to make a loop to attach your earring hook. Now you will use your needle nose pliers to loop the excess of the pin (like a jump ring) so the earring hook is attached. Make sure you close your loop tight enough so they don’t slip off your earrings.

If all went well, you should now have a funky pair of dangling earrings!