Browsing Tag

recycle

Design Your Life

10 Easy Ways To Be More Eco Friendly

08/13/2010

Being environmentally friendly is big news these days, and here I share with you my top ten tips to be an eco warrior.

recycle

1. Use public transport. Better yet, walk.

It’s an easy one, but it works. It’s stated that New Yorkers save on average $19 billion a year simply by using sustainable transportation. This shows that in addition to being good for the environment, it’s good financially too!

2. Reduce, reuse and recycle.

This is important for so many reasons and it takes just a tiny bit of extra effort. From saving habitat destruction to reducing pollution caused by waste, the advantages of this are huge.

3. Eat locally sourced produce.

Visit your local farm shop or farmers market. Not only is the food from there more eco friendly, it’s healthier, tastes better and is often inexpensive!

4. Use both sides of paper.

I am guilty of this one, but it’s such a simple way to help cut down on deforestation!

5. Use canvas bags when shopping.

There really is no excuse for not implementing this one. Everyone uses them now, even super models like Kate Moss have been snapped with them!

6. Wear extra clothing rather than turn up the heating.

It’s so simple yet so easily effective.

7. Download music, rather than buying CDs.

It cuts out on waste and is so much better for the environment.

8. Switch everything off at the plugs every night.

This can save a huge amount of wasted energy and takes just a few seconds!

9. Refill water bottles.

Refilling water bottles rather than buying more each day cuts down on waste and is way better for the environment!

10. Use rechargeable batteries.

This can save you money as well as being a step towards being an eco warrior!

So those are my top tips, what are yours?
Crafts DIY

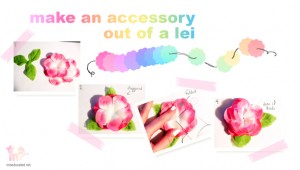
Make a Flower Accessory with a Hawaiian Lei

03/30/2010

Feeling crafty? Are you not sure what to do with the Hawaiian lei that you’ve had for years but, its so pretty you don’t want to get rid of it? Make a cute accessory with it! Its fun, easy and you only need a few materials…

featsm

You Need

Fabric Hawaiian Lei
Scissors
Needle
Thread
Clear nail polish
Hot glue gun

Get a container to put all of your loose flowers in and cut the string of the lei. Keep them so you can make more later, because your friends will probably want one too. Pick out about five or six loose flowers and a leaf (if your lei has them) if you want to incorporate it.

Stack the loose flowers on top of eachother, with the leaf at the bottom. Try to stagger the petals so that they aren’t perfectly lined up (like in the picture) and slip one or two pins through to hold them together while you work.

Run a few small stitches through the middle of the flower. You don’t need to do very many, just make sure its secure and the thread won’t come loose. Try to make sure your thread is the same or, close to the same color as the fabric so it stays invisible. If you have to use a different color (like I did) it won’t be too bad, just try to stay close to the center.

Now you can make your flower look more three-dimensional, like a rose or a peony. If you like the flat look, you can skip this step. Starting with the petals on top, fold one side over and run a few small stitches close to the center. Work your way around on different layers, repeating this step until your flower has the shape that you want.

Swipe a little clear nail polish along the edges of the petals so that they don’t fray any more than they may have already. You can also use your scissors to trim any strays.

Now you can attach your flower to… pretty much anything! Use a hot glue gun or your trusty needle and thread to tack it onto a pin, barrette or head band. You can also attach it to a hair tie or wear it around your wrist like a corsage. Decorate a plain hand bag with colorful fabric flowers!

More Ideas

Run some fabric glitter around the edges of the petals, or make “rain drops” in random spots.
Attach a button, pretty bead or cabochon to the middle.
Hot glue some some crystal rhinestones on the petals to create the “rain drops”.
Add other embellishments to the bottom of the flower like ribbons or lace.

If you make one, feel free to post it in the comments!

Self Decoration

Recycle and Upcycle Happy Meal Toys

11/10/2009

Eh, so sometimes when my husband and I are running late or feeling really nasty we’ll grab happy meals — mainly just when the toys are cute… but what the hell do you do with the little plastic toys after you eat your meal?

Make something out of them!

My plan was to attach gems and glitter all over my lovely ponies and headbands with sweet unicorn emblems. Every headband is on it’s way to a special home for fun and whimsy instead of being chewed up in Wanwan’s bed or thrown in the garbage. 😉 Perhaps soon we’ll do some more silly DIY with all the plastic junk we always come across! ha

(go ahead and keep the box too for silly gifts to friends — haha)

Show me the plastic flash

Unconditional Kisses

Eating the food is like eating the box

You want dis?

Photos by Benjamin Amick <3 Dress: Manoush; Headband: DIY; Shoes: Russe & Rilakuma

Miseducated Inspired Love


Ariel: The Forest
Crafts DIY

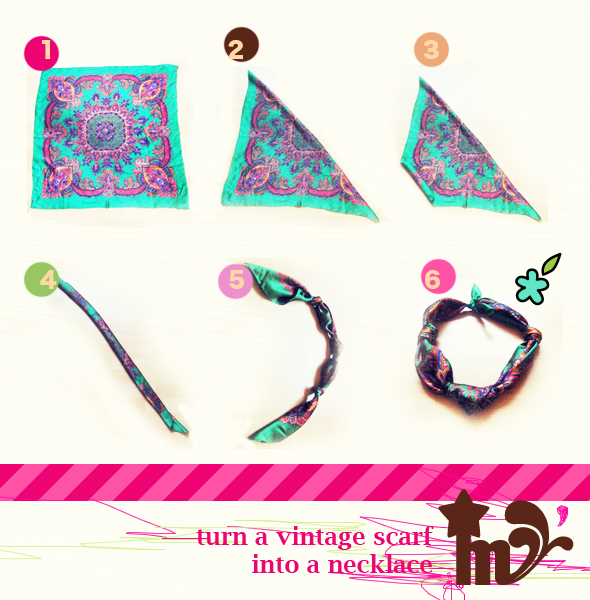
Recycle your Vintage Scarf into a Necklace

10/29/2009

This is a style that I wear all the time and it’s easy easy to make. I’ve loved vintage scarves but for ages I was stumped as to how to wear them without looking like the queen! Finally a brainwave brought me to the knotted scarf necklace …

You will need a patterned scarf of square of fabric, about 30″ (76cm) x 30″ to start!

scarf

1. Lay your scarf flat, pattern side down.
2. Fold it in half, so the patterned side is on the outside.
3. Start rolling from the corner …
4. … Until you have a long sausage.
5. Tie three knots – one in the centre, and two either side.
6. Finally, tie at the top, and there you have your necklace.

I’ve used a green paisley scarf for this one, but it works with any pattern, or even a plain silk scarf. I especially love it in a nautical or equestrian print.

I think I’m Miseducated because I don’t wait for beautiful things to come to me, if I have something pictured in my mind, I’ll try and make it. Sometimes I succeed, sometimes I fail but it’s all worth it when you get complimented on your outfit and you can say ‘I made it myself!’

Crafts DIY

Cute as a Button Earrings You Can Make

01/13/2009

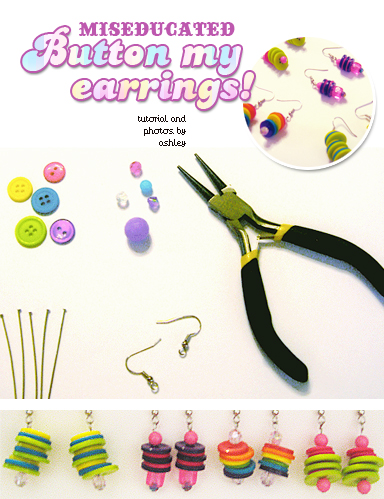
Most of us have seen button stud earrings, and maybe even the cluster button earrings. Either way, here’s a new twist on the popular trend. I call them Swivel Stacked Button Earrings. They are extremely easy to make, and can be done using all kinds of variations, colors, and different kinds of beads.

button my earrings

What you’ll need

Flat Headpins (preferably the long ones)
Buttons in assorted colors and sizes (you could also experiment with different shapes for unique looks)
Various beads (small ones are used to keep buttons on headpin, while others can be used for decorative purposes)
French Hook Earrings
Wire Trimmers
Needle Nose Pliers

Step 1

Since most buttons have too large of a whole, you’ll need to first put a small bead on the headpin to keep buttons from sliding off.

Step 2

Take your buttons and put them on in any order you want. You can vary from size or colors depending on the look you want. At this point, you can also add various beads if you choose.

Step 3

Once you’ve got your earrings looking the way you want, it’s time to attach the headpin to a French hook earring. Assuming you have quite a bit of length left on your headpin, this is where you can trim off any excess. Be sure to leave enough length to make a loop to attach your earring hook. Now you will use your needle nose pliers to loop the excess of the pin (like a jump ring) so the earring hook is attached. Make sure you close your loop tight enough so they don’t slip off your earrings.

If all went well, you should now have a funky pair of dangling earrings!