Want to know how to make candy CSS borders to use with your tastee backgrounds? Feel free to use these for your website, simply credit Miseducated https://www.miseducated.com so that others can enjoy the candy. :9 Have more fun with palettes at colourlovers.com.
Miseducated girls like to stand out in a crowd. Which is precisely why this make-it-yourself, fully customizable lip gloss recipe is perfect. (Not to mention, Miseducated-mavens always have pretty puckers).
Read through this super easy recipe and then feel free to add whatever your heart desires (within reason, of course!) to make your very own lip gloss.
You Need
Option 1 (the extra-easy route)
Have you ever applied Vaseline to your lips? Well whether you have or haven’t, it’s a great moisturizer for your puckers. If you prefer to take the easy route (which is great when you’re in a bind), can use this as your base and then customize the rest.
Option 2
Take 1 tablespoon of beeswax and place it in a clean glass jar. Place the jar in very hot water. Be careful not to get water in it as the two don’t mix well. With a toothpick or stick-like device, stir until you see that the wax has softened.
Next, add a tablespoon of almond oil. Mix thoroughly. If you want, you can add a capsule of Vitamin E which preserves your gloss for a longer amount of time and also adds nutrients. Another option is to add ½ a teaspoon of honey. This makes it a little sweeter and also adds nutrients.
If you’re a simple lassie then you can stop here. If you’re in the mood to customize, here are a few ideas to give a go:
Customize your Gloss
Fresh and Fruity
Add a few berries to your mixture while it’s hot. Crush the berries and pick out the skin or strain it. Some great berries to try are cranberries (which create a lovely shade of dark pink) or blueberries which create a pinky-tone. [Check out my Berry Beauty article which has a great Blueberry Honey gloss].
Mighty Mint
Add a few drops of peppermint or spearmint oil, mix it up and you’re set to go! Refreshing!
Cola Queen
Add a few drops of your favorite cola (try Sprite or Orange!) and mix thoroughly. Yum!
Charming Chocolate
You can either purchase chocolate scented oil or melt a little piece of chocolate with your beeswax. Guaranteed to melt on your lips! That’s a good thing.
Whimsical Flowers
Feeling romantic and whimsy? Try a little jasmine, rose or lavender oil!
Brewed Beer Gloss
That’s right! Infuse your lips with the scent of beer! Just add a few drops of your favorite brew and mix it up.
Lemon Lady
If citrus is your thing, squeeze a bit o’ lemon, lime or orange juice into your beeswax and mix thoroughly. Zing!
These are just a few ideas. Let your mind go free and you’re sure to come up with even better customizations!
*Make this gloss in small doses as it does not last forever. Store it in your fridge at night to make it last longer. Oh, and if you want to bring it out with you (a total “do”), store it in a recycled lip gloss container or even a fabulous little pill box!
We all know that eggs are a great food source and mega healthy for your body. But did you know that the all-natural item is also beneficial for your skin? In fact, egg whites clear up/prevent acne and blemishes, tightens skin and decreases signs of age.
Here are a few egg*y DIY beauty recipes for you to try at home! I promise, these recipes will yield products just as good (if not better) than any spa could provide you!
Chilled eggs and honey face mask
This cool face mask is great for dry skin. It’s soothing and moisturizing! Here’s what you need:
1 egg
1/2 cup coconut oil
1 tbs honey
(1) Heat your coconut so that it is warm, but not too hot. You can do this in a microwave save container in your microwave or over the stove at a low-medium heat.
(2) The first thing you need to do is crack your egg open into a small bowl. Beat the egg until it is foamy and consistent in texture.
(3) After you’ve finished stirring the egg, gradually add your warm coconut oil. Doesn’t it smell delicious? Next, add your tablespoon of honey. Beat all of these ingredients until you have a semi-thick consistency (similar to mayonnaise).
(4) This next part will sound a little strange! Use an empty toilet paper roll and place one end into a bowl. Put your mixture inside of the roll and place it in the freezer. Remove the roll once the contents inside are completely frozen!
(5) Once it’s frozen, peel part of the toilet paper roll away (about 1/4 inch) and apply to your face, rubbing it around in a circular motion. It should resemble a frozen popsicle! Let the contents sit on your face for about 10 minutes and then rinse with warm water. Splash your face with cold water to tighten pores and gently pat dry.
*You will have plenty left over for future-use! Simply cover with a plastic bag and place in the freezer again.
Moisturizing Egg Yolk Hair Mask
This recipe is super easy and a great cure-all for dry hair, dead/split ends and frizz issues! Gather these items before you begin:
1 egg yolk
1 cup milk
1/2 tbs. rosewater (optional)
(1) Separate the egg yolk from the egg white and place in a small-medium sized bowl. Beat the yolk until there are lots of little bubbles on the top – it should be frothy looking!
(2) Gradually add the milk in. If you have rosewater, you may add the 1/2 tbs. at this time. Mix all of the ingredients together until you reach a consistent texture.
(3) Apply the mixture onto your hair, starting with the ends (which tend to be the driest). Work your way up until your hair is fully coated.
(4) After 15 minutes, rinse the egg mixture from your hair with tepid water (if it’s too hot you’ll end up with scrambled egg-yolk hair). Make sure you remove everything!
Shine Reducing Egg and Lemon Treatment
This treatment does wonders for a tired and/or oily face. Not only does it firm and tighten skin but it also reduces shine. Here’s what you need:
1 egg white
1 medium sized lemon
(1) Separate the egg white from the egg yolk and place in a small-medium sized bowl.
(2) Cut the lemon in half and squeeze out the juice into your bowl. Remove any seeds that may have danced their way into the bowl!
(3) Whisk the lemon juice and egg until it is completely blended. The texture should be smooth and consistent.
(4) Apply the concoction onto your face and let it set for 15 minutes. Once it’s hard and flaky, rinse the mixture from your face with warm water. Splash your face with cold water to tighten pores and gently pat dry.
You may follow up with your nightly moisturizer.
Good luck and happy beauty!
I am a twenty-four year old woman and I don’t know what I want to be, do or where I want to live when I grow up. Sound familiar? Lately I’ve spoken to a lot of girl friends and women and have found they all have questions and concerns about the life they have chosen and the lifestyles they are living. Women have more choices than their mothers and grandmothers, they have a choice to be whoever they want to be, to live however they want to live. This also makes for more stress, what if you miss your chance? What if you wake up when you’re 60 and realize you didn’t achieve any of your main goals and choices? Possibilities are endless. Lately ladies have been finding economic stresses and lifestyle decisions that leave them in shells, filled with questions. How can you decide how to live your life when you can’t even afford to live it? Will you marry? Start family? Start a business? Travel the world and write a novel? Record a demo and play your songs live? Redesign a product? Help people in some way? Whatever you life you create, build it — be conscious you’re always changing and you’re always molding your life into the life of your dreams. If you’re not happy where you are after honestly questioning yourself, find new routes, question yourself about new goals and dreams, make steps to create the life you want and that life will be yours.
DIY Lifestyle
Step 1: What is my lacking in? What is abundant in my life?
Step 2: What is my dream life and what goals do I want to achieve in life?
Step 3: How can I achieve these goals? (even if you’re not sure, quite a lot of resources are available for us to research possibilities)
Step 4: Make conscious efforts, daily, to create that life and achieve those goals. Talk to people doing what you want to do, tell them you admire them and get advice.
Step 5: Continue working towards and gaining the benefits of your dream lifestyle.
Lifestyle Inspiration
Is it most important to you to do what you want to do, live where you want to live or to live with whom you want to live with?
Lifestyle Q&A
Reply or contact us for questions and comments regarding this article~ Please communicate with us if you do not want your questions/comments to show here after discussed and answered.
* The photo above was taken by myself in Hello Kitty’s house (Puroland, Japan).
Before you begin
Choose boxes or frames “unfinished”; paint them with acrylic paint gold or silver (or whatever color you want, depending on your color scheme) just to have a base for the tiles to stick to. I don’t like to show raw wood between tiles because I don’t use grout in between the tiles (too messy and may scratch). Paint back and edges.
Supplies
Polymer clay (various colors)
Acrylic roller and/or pasta machine
Cookie cutters and craft blade
Stamps ( rubber or any texture you find around your house)
Acrylic paint and brushes
Metallic powders
Varnish for polymer clay
Glue (Liquid nails or Weldbond are good)
Oven (don’t use you home oven)
Creating Mosaics
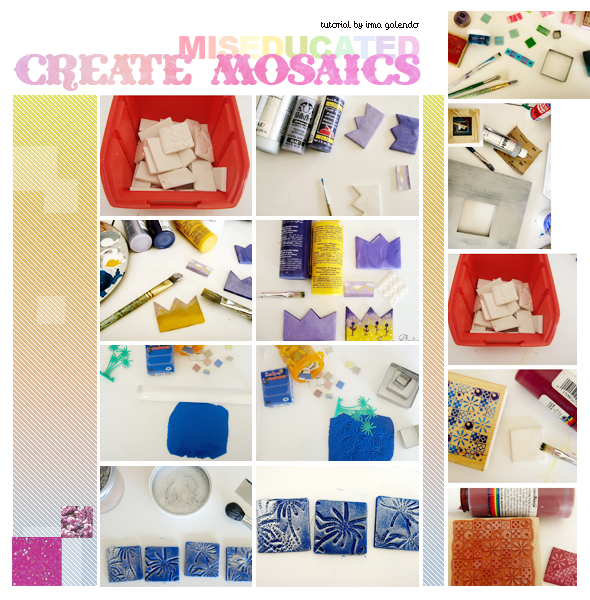
Paint white tiles as if they were little canvases using acrylic paint.. get creative! Use more than one color. Paint a single tile with multi colors or a landscape, try to make small pictures.. tell a story.
Mosaics with Texture
Cut the polymer clay until desired thickness, approx. 3mm ( see picture ). Gently stamp with your texture (I use toy palms in this case, you can use any texture like buttons, stamps, texture sheet, etc ). You can use mica powders or metallic powders to enhance the texture, then cut my tiles with the cookie cutters or a blade (squares are easy to arrange on you frame). I bake them following the instructions for the polymer clay brand. I don’t like to use a regular oven (fumes).
Mosaics with Stamps
Paint white tiles with acrylic paint, before they dry gently stamp them, it will take the paint off the tile creating a negative image of the stamp. Use rubber stamps for this and wash them after each use.
Making the Mosaic Mirror
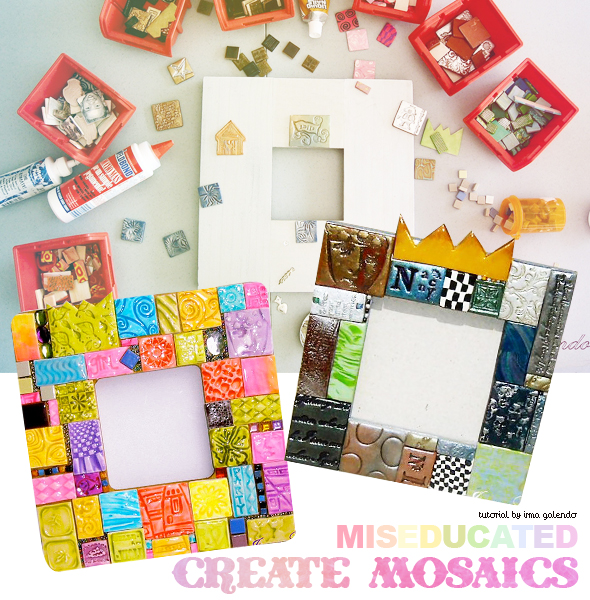
I classify the mosaics by color, so they are easy to arrange when designing the mirror.
Arrange tiles on the frame as a puzzle and when you like the composition glue each tile. You may use ceramic tiles, milagros, beads, etc. just to have different textures and fill spaces when I don’t find the correct size of tile.
The last step is varnishing the tiles.
Use your imagination and have fun!
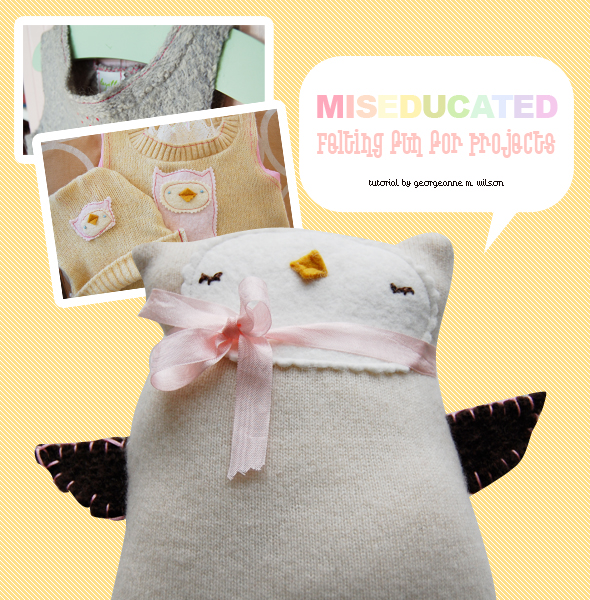
Working with wool has become one of my favorite creative endeavors. I love the unique way each article of clothing comes out just a bit differently than another. I use any used or new sweaters and am always on the hunt for vintage wool skirts or jackets to use in my projects. I love to use them to make baby clothes or toys. Little stuffed woolies are lots of fun to make. Using wool makes me feel happy to be able to put to use something someone else believes to be un-useful (is that a word???). No two items I make are alike. I don’t use patterns because I find it easier to ‘eyeball’ the felted sweater and let the colors and textures dictate what will come of it. If you are a ‘pattern person’ (what a title!), you most certainly could use patterns with this kind of felted fabric.
1. Find a beautiful 100% wool sweater that is in good condition. Be sure to check the label carefully. Do not purchase or use one that says it’s okay to ‘Machine Wash’ it. Some wool sweaters have been treated for easier care and do not require dry cleaning… the process they use will prevent it from felting-the desired effect! Use only one that recommends dry cleaning or hand washing.
2. Machine wash in warm water with 1Tbsp. soap or detergent. Wool fibers have little barbs on them and the agitation of a machine wash cycle binds the fibers together. When felted, a garment will shrink and become thick, dense and will not unravel when cut. After washing, check to see if the sweater is now ‘felted’ enough for what you desire to make. If not, either rewash or for further felting, dry it in a warm dryer. If it is rumpley after washing, iron with an iron using the ‘wool’ setting. Wool is a very durable product and responds well to misting and ironing.
3. Once your item is dry and smoothed out with an iron, you may begin to design and construct your item. If making a dress for baby, you can use the neckline or collar area of the sweater for the neckline of your new dress. Sometimes you will need to put darts in the back of the neck or cut it in the back and re-seam it to reduce the size of the neck. Because properly felted wool does not unravel, you will probably not have to hem or bind your hem or sleeves but sometimes I do anyway. A sweet cotton fabric can add a lot for extra detail. The sleeves of the sweater can be used to make leg warmers to match or save them for a pair of hand warmers for yourself or a friend!
4. After your pieces are cut out, sew them together with a machine using either a regular straight stitch or serger. Appliquéing a unique design on your dress or romper will personalize it and add whimsy and interest, but be sure to do the appliqué or embroidery work before you sew front to back; it’s just easier. Above all, have fun! This example is just one of many ways to use wool sweaters. Get creative and enjoy!
When it comes to DIY Beauty, recipes using vinegar are all the craze. Why? Because vinegar does an excellent job of cleaning, polishing and wiping away impurities. In addition, vinegar is easy to come by, inexpensive and always practical. Here are a few recipes to give a try the next time you’ve got vinegar to spare and money to save!
Apple Vinegar Hair Rinse
After using various products and chemicals on your hair, it tends to become dull, lifeless and not too healthy. A major culprit of this is product build up. This recipe does wonders for that dilemma and should be done once a week. Here’s what you need:
1 small-medium lemon
2 tablespoons apple vinegar
2 tablespoons warm water
In a small bowl, combine your water and vinegar. Cut your lemon in half and squeeze out the contents of half of it. Make sure to remove any seeds that escape! Mix thoroughly and let it set for 5-10 minutes while you’re washing your hair. After washing your hair in the shower, apply this mixture thoroughly. Let it set for 2 minutes and then rinse out with tepid water (cold if you can bare it).
Vinegar Astringent for your Face
This is great for oily, acne-prone skin and can be whipped up in a flash. All you need is water and a little vinegar and you’re all set. Here’s the specifics:
1 tablespoon apple cider vinegar
2 tablespoons warm water
Cotton balls
Combine both ingredients and dip your cotton ball into the mixture. After using your regular face wash, apply this evenly by wiping the cotton ball around your face. Let it set for 10 minutes and then rinse thoroughly with cold water to tighten pores. Gently pat dry.
Strawberry Vinegar Face Mask
This sweet treat makes your skin glow and is easy to prepare. Gather these items:
5-6 medium sized strawberries
1 tablespoon apple cider vinegar
1 egg white
First, separate your egg yolk from your egg white into a medium sized bowl. In a separate bowl, mash your strawberries until they are relatively smooth/consistent. Add the egg white to your strawberries and mix well. Gradually add the vinegar and stir until you have a nice paste.
After washing your face with your typical face wash, apply the mixture generously onto your face. Let it set for 15 minutes and rinse with warm water. Splash cold water on your face to tighten pores and gently pat dry.
Have you ever loved a food or drink so much that you wish you could bathe in it?
I’m a huge fan of tea: the immune boost, the antioxidants, the warm fuzzy feeling of a hot mug on a cold night. I think my ultimate evening consists of curling up on the couch with a cup of tea and a box of cookies for dunking. In short, I truly do love tea so much that I could bathe in it… and last year, I did.
The time: early spring. The location: Lennox Head, Australia. I had the amazing opportunity to visit my sister at her work abroad location there and her camp was located just steps away from Lake Ainsworth, a freshwater lake made entirely out of tea.
Surrounded by tea trees, Lake Ainsworth’s waters absorb tannins from surrounding tree roots and fallen tea leaves, transforming the waters into a deep, dark brew. The locals believe that the water has healing properties and that a quick swim can do wonders for the skin. Personally, though my skin did feel a bit softer that day, it’s my mind that has never felt more at peace than while floating in a bath of tea.
Want to try it yourself?
If you can’t make the trip Down Under, don’t worry, just run yourself a hot bath, drop in several tea bags, lay back, and relax.
Feeling crafty?
You can also create your own concoction with loose tea leaves and dried flowers. Once it’s ready, wrap your personalized mixture in muslin or cheesecloth (or pantyhose — thanks, Wendy!) and you‘re ready for a long, relaxing steep.
Other Drinks to Soak In
- Sake: A Geisha secret, pouring a cup full of sake into your tub is said to soften your skin and speed up your metabolism.
- Milk and Honey: Milk dissolved dead skin cells to make your skin baby soft, while honey has antibacterial properties to help heal wounds. It worked wonders for Cleopatra, so why not you?
- Red Wine: Teri Hatcher of Desperate Housewives breaks out the vino for her bath to make her skin lush and glowing…just don‘t use too much or you might stain your tub!
Hi, my name is Amanda Yu, I am the owner and designer of ”Exotic Flavour” the colorful, playful and creative jewelry design. I am grateful that I had been invited by Miseducated to prepare this DIY story for you. I hope you will like it. I will show you how to make this Fortune Coins Pink Necklace.
Instructions
1. The material is very simple, prepare a Pink cotton cord (length: 155cm and thick: 3mm) and Sex piece of the round wood ornament with a hole in the middle.
2. Put on one wood ornament and make a knot. This is a part of the clasp.
3. Coil two small circles, hold tight with your left thump.
4. Round the third circle between the first two circles, pull the cord generally.
5. Put another wood ornament and repeat (3.) and (4.) until you have five patterns.
6. In the end of the cord I made an oriental cross knot and tight it nicely.
7. If you think it is complicated, you can make any knots you like. Just make sure the little circle is not too big for the wood ornament – other part of the clasp. (1)
8. The Fortune Coins Pink Necklace is now finished.
I hope you find this is inspiring. You can combine with different materials or perhaps develop another construction from this basic oriental knot. Here are two other creation I made earlier based on the same techniques.
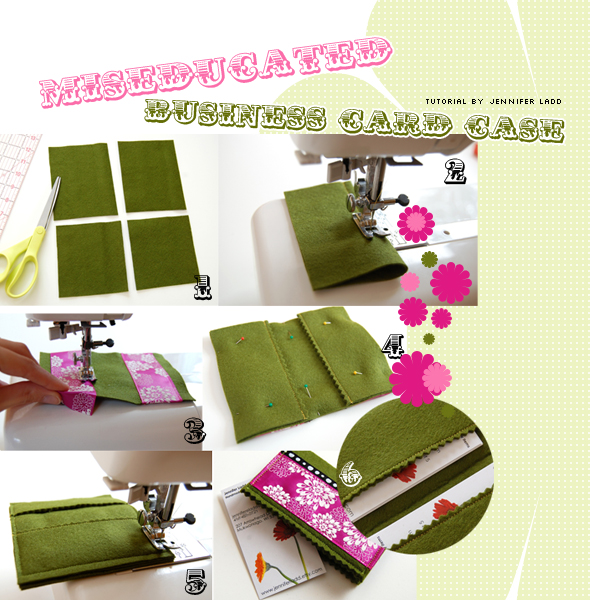
I love this cute business card case. It’s an easy-to-make, quick project and it has such a big impact when it is finished. I love how easy it is to customize to your own taste (by choosing different colors and different ribbon) so it can really represent your own business style. I use a sewing machine to make it, but it would be perfectly fine to hand-sew the case if you don’t have a machine.
Supplies
1/8 yard of wool felt
12″ of ribbon (I used two pieces of 12″ ribbon in my case)
thread
optional: pinking shears
Instructions
1 Cut four pieces of wool felt: two pieces are 5.5″ by 4.25″, the other two pieces 4.75″ by 4.25″.
2. Fold the smaller piece in half so that the folded edge is the one that is 4.25″ across. Sew along the folded edge. I use the edge of my zipper foot as a guide when I sew to help make this seam straight – just line the edge of the fold up with the edge of your foot.
3. Optional: I use pinking shears to trim the seam and give the edge a more decorative look. You don’t have to do this step if you would like your edge straight.
4. Repeat with the other small piece of fabric.
5. Cut your ribbon in half. Pin one piece of ribbon onto each of the shorter edges of one of your larger pieces of felt. Fold the edges under your felt before you sew so they will be caught by your stitching and held securely in place. Stitch a seam across both edges of the ribbon to hold it in place.
6. Make a sandwich with all of your pieces: first lay your felt with the ribbon face down, then the other large piece of felt. Then place one of your folded pieces at each edge (with the stitched edges toward the center). Pin all these layer together so they don’t move while you sew them.
7 Stitch carefully around all the edges.
8. Optional: I use my pinking shears again to add a decorative edge to the bottom.
9. Yea! You’re finished! Fold your case in half, insert business cards into each side, and enjoy!

